Friday, July 25, 2014

How to manually force a Directory Synchronization with the new DirSync tool

In the latest release of the Windows Azure Directory Synchronization tool (aka DirSync), the way we manually force a directory synchronization has changed.

In previous versions, we had to navigate to the location where DirSync was installed, launch DirSyncConfigShell.psc1 (PowerShell Console) and then run the Start-OnlineCoexistenceSync cmdlet:
 
 
However, in this latest version this console file does not exist anymore:
 
 
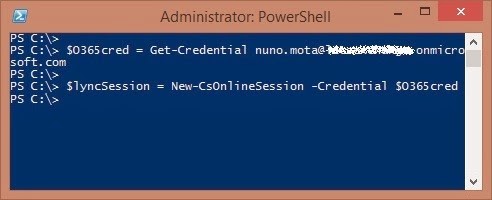
So how do we manually force a directory synchronization now?! Well, DirSync cmdlets are now part of a PowerShell module named DirSync. As such, simply lunch a PowerShell console with administrative rights, import this module and run the usual Start-OnlineCoexistenceSync cmdlet. Simple as that!
 
This change, however, will obviously break any scripts you might have developed, but it shouldn’t be hard to update them.


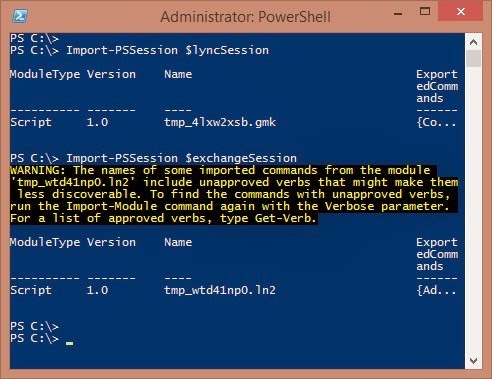
As expected, if you try to import this module in an older version of DirSync, you will get the following error as the module does not exist:
 
 
If we try to list all the cmdlets available in this module, we actually don’t receive anything back:
 
 
So where are all the DirSync PowerShell cmdlets we had in previous versions?! Not to worry. The DirSync module is actually just a wrapper which calls “%programfiles% \Windows Azure Active Directory Sync\DirSync\DirSync.psd1”. As such, if we want to list all the cmdlets, we have to check the Microsoft.Online.Coexistence.PS.Config module instead:
 
 
Unfortunately not all of these cmdlets are fully documented yet, but we can guess what most of them do based on their name anyway.
 
 
In my opinion, this change is more than welcomed as it makes life a lot easier!

Monday, July 21, 2014

Exchange 2013 with Rights Management Connector

Windows Rights Management Services (also known as Rights Management Services, Active Directory Rights Management Services or simply RMS) is a form of Information Rights Management used on Microsoft Windows that uses encryption and a form of selective functionality denial in order to limit access to information, such as e-mails or Word documents for example, and enforce what operations authorized users can perform on them.
Users can use this technology to encrypt information stored in such document formats, and through policies embedded in these, prevent the protected content from being decrypted except by specified people or groups, under certain conditions, and even for certain periods of time. Specific operations such as printing, copying, editing, forwarding and deleting can be allowed or disallowed by the author.
 
Rights Management Server first debuted in 2005 as an add-on to Windows Server 2003, with client API libraries made available for Windows XP and Windows 2000. With Windows Server 2008, it was renamed to Active Directory Rights Management Services [ADRMS], reflecting its higher level of integration with AD.

The next big “upgrade” was in July 2013 when Microsoft released a preview of Azure Rights Management which allows organizations to protect their data in Office 365. Azure RMS is included with E3, E4, A3 and A4 plans at no additional cost, or it can be purchased as a standalone subscription.
 
For organizations that are in the process of migrating to Office 365 there is a feature called RMS Connector that enables protected content to work with an organization’s online services as well as on-premises servers.
 
RMS connector lets administrators enable existing on-premises servers, such as Exchange, SharePoint or even file servers running Windows Server to use their Information Rights Management [IRM] functionality with the cloud-based RMS. With this functionality, IT and users can easily protect information both inside and outside the organization, without having to install additional infrastructure or establish trust relationships with other organizations.

The RMS connector is a small-footprint service that is installed on-premises on servers that run Windows Server 2008 R2, 2012 or 2012 R2. After installed and configured, it acts as a communications interface (a relay) between the on-premises IRM-enabled servers and the cloud service.

To read the entire article, please check Exchange 2013 with Rights Management Connector on MSExchange.org.


Monday, July 14, 2014

AssociatedItemCount versus ItemCount in Exchange

When running the Get-MailboxStatistics cmdlet, two of the attributes returned are AssociatedItemCount and ItemCount. But what exactly are the differences between the two?!
 
As one would expect, ItemCount is the total number of e-mails, contacts, etc. items available and visible to the end-user on the mailbox. Basically, everything the users sees.
 
On the other hand, AssociatedItemCount are special messages in the Associated Table of a folder. They are most often rules and other special messages like the MRM FAI message. Basically, things that are “associated” with a folder, usually other file-like objects not visible to users such as IPM.Configuration.RssRule, IPM.Configuration.AutoComplete, Outlook Rules Organizer or IPM.Microsoft.MigrationStatus.
 
These are not visible to the user, only through MFCMapi for example (right-click a folder and select Open Associated Contents table).
 
Folder Associated Information (FAI) is a collection of message objects that are stored in a folder object and are typically hidden from view by e-mail applications. An FAI Message object is used to store a variety of settings and auxiliary data, including forms, views, calendar options, favorites and category lists.

Thursday, July 10, 2014

Database Availability Group Failover during a Mailbox Move

During a mailbox move operation if the active database becomes unavailable then the Mailbox Replication Service [MRS] contacts the active manager to see which copy will take over. MRS then logs on to the mailbox on the new database and continues with the move process from where it left off. This as long as the DataMoveReplicationConstraint setting for the database is set to something else other than None and as long as the database was not down for longer than 30 minutes (or there is another copy satisfying the constraint).
 
Let us assume the database has 3 copies. It is entirely possible that MRS will just continue working after a failover even if the original server is down.
 
If DataMoveReplicationConstraint is set to None then MRS will try to connect to the same database every 30 seconds for the next 30 minutes. The 30 minute is from the maximum retry of 60 times every 30 seconds. This value can be changed in the in the msExchMailboxReplication.exe.config file.
 
The DataMoveReplicationConstraint parameter specifies the throttling behavior for high availability mailbox moves. The possible values are:
  • None: moves should not be throttled to ensure high availability. Use this setting if the database is not part of a DAG;
  • SecondCopy (default): at least one passive mailbox database copy must have the most recent changes synchronized. Use this setting to indicate that the database is replicated to one or more mailbox database copies;
  • SecondDatacenter: at least one passive mailbox database copy in another AD site must have the most recent changes replicated. Use this setting to indicate that the database is replicated to database copies in multiple AD sites;
  • AllDatacenters: at least one passive mailbox database copy in each AD site must have the most recent changes replicated. Use this setting to indicate that the database is replicated to database copies in multiple AD sites;
  • AllCopies: all copies of the database must have the most recent changes replicated. Use this setting to indicate that the database is replicated to one or more mailbox database copies.
 Note: any value other than None enables MRS to coordinate with Active Manager.

Monday, July 7, 2014

Exchange server has failed to heartbeat error after uninstalling Exchange

When you uninstall Exchange 2013, you might encounter the following error in the Event Log regarding the Managed Availability’s monitoring agent complaining that the server you uninstalled is not available:
Log Name: Microsoft-Exchange-ManagedAvailability/Monitoring
Source: Microsoft-Exchange-ManagedAvailability
Event ID: 4
Task Category: Monitoring
Level: Error
Description: Machine “uninstalled_server” has failed to heartbeat since “unistalled_date_and_time”, as observed by machine “some_other_server”. Restarting the Exchange Health Manager service did not fix the problem.

The problem is that the old server continues to be present under the following registry key for all other Exchange Servers:
HKEY_LOCAL_MACHINE\SOFTWARE\Microsoft\ExchangeServer\v15\ActiveMonitoring\Subjects

This causes the error above in the Event Log or SCOM alerts. If this happens, the workaround is to simply delete the old server(s) from the registry key mentioned above on the remaining servers.

Microsoft says that this bug was previously closed as Won’t Fix but that they have re-opened it for re-triage.

Thursday, July 3, 2014

Managing Lync Online and Exchange Online from the same PowerShell session

When working with Office 365, administrators often need to resort to PowerShell in order to perform certain configuration tasks or reporting. One “issue” is that Lync Online and Exchange Online do not share the same URI, nor do they use the same connection method. This implies that administrators need to use separate sessions to manage both Lync and Exchange Online.

But is this really true? No! It is perfectly possible to manage both products from the same instance of PowerShell. To begin with, start PowerShell and connect to Lync Online (remember that you will need Windows PowerShell Module for Lync Online):
$O365cred = Get-Credential user@domain.onmicrosoft.com
$lyncSession = New-CsOnlineSession -Credential $O365cred


Next, use a similar process to connect to Exchange Online (you do not need to create a new Credentials object):
$exchangeSession = New-PSSession -ConfigurationName Microsoft.Exchange -ConnectionUri "https://outlook.office365.com/powershell-liveid/" -Credential $O365cred -Authentication Basic -AllowRedirection


At this point, you should have two separate remote sessions running on your computer. To verify this, type the following command at the PowerShell prompt:
Get-PSSession


You now have a pair of remote sessions that can be imported into your local session of Windows PowerShell. To do that, run these two commands:
Import-PSSession $lyncSession
Import-PSSession $exchangeSession


At this point, you will have both the Lync Online and the Exchange Online cmdlets available for use. To verify this, use the Get-CsOnlineUser and the Get-Mailbox cmdlets, for example, and make sure that you get back user information:


When you want to end your management session, make sure that you close both remote sessions:
Remove-PSSession $lyncSession
Remove-PSSession $exchangeSession