Saturday, June 18, 2016

Check Distribution Groups Created

Some organizations provide self-service for Distribution Groups (DG), that is, users are able to create DGs that are available in the Global Address List for everyone to use. Even if an organization does not have a naming convention in place, it is always important to keep an eye on what DGs are created in case a user creates one that is not acceptable.

To do this, we can use the Get-DistributionGroup cmdlet together with the WhenCreated parameter to search for DGs created in the last week, for example. However, using this cmdlet we can see who the DG’s manager is but not exactly who created it. So, we need to use the Admin Audit Logs feature already covered in some tips and articles at MSExchange.org such as the Administrator Audit Logging article by Neil Hobson. Since we will be relying on this feature, it is important that it is enabled and that we keep these logs for as long as we need to.

Another advantage of using these logs, is that we can check for DGs that were created and subsequently deleted!

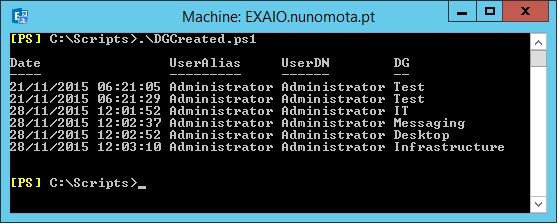
The following basic script will search the Admin Audit Logs for any DG created and return some information about it such as when it was created, by whom and its display name:
Param (
 [Parameter(Position = 0, Mandatory = $False)]
 [String] $From = "01/01/2016"
)


[Array] $DGs = @()

Search-AdminAuditLog -StartDate $From -Cmdlets New-DistributionGroup | Sort RunDate | % {
 $DG = $_.ObjectModified.Split("/")
 $DG = $DG[$DG.count - 1]

 $user = $_.Caller.Split("/")
 $user = $user[$user.Count - 1]
 $userDN = (Get-Mailbox $user).DisplayName

 $DG = New-Object PSObject -Property @{
  Date  = $_.RunDate
  UserAlias = $user
  UserDN  = $userDN
  DG  = $DG
 }

 $DGs += $DG

}

$DGs | Sort Date | FT Date, UserAlias, UserDN, DG -AutoSize


For a more complete report, please check my Exchange Distribution Group Creation Report article on MSExchange.org which generates an HTML report similar to:


Enable or Disable File Formats for Exchange Search

In Exchange 2013/2016, Exchange Search includes built-in support for indexing many file formats. In order to enable or disable specific file formats for Exchange Search, we use the Set-SearchDocumentFormat cmdlet (which is only available in on-premises Exchange 2013/2016).

When we disable a file format for content indexing by Exchange Search, contents of the file become unsearchable by Exchange Search clients such as Outlook Web App, Outlook in online mode and In-Place eDiscovery.

Let us say that we do not want to include ZIP files. To do this, we simply run the following cmdlet:
Set-SearchDocumentFormat ZIP -Enabled $False

If we disable indexing for a supported file format, such as in the example above, items containing an attachment of that file type are not considered unsearchable. When we perform an In-Place eDiscovery search, and we select the option to include unsearchable items, only items that are actually unsearchable are returned. Items that were not searched because the associated file format is set as unsearchable are not returned.

Please note that JPG and GIF formats are not really used even if enabled. Exchange indexes their metadata but will not scan/OCR the image itself. Exchange will deliberately skip over images and mark the items as partially processed.

Undo Ignore Conversation in Outlook

Outlook has a great feature that allows us to “ignore” particular email conversations that do not really interest us without asking the sender(s) to remove us from future emails. When we select Ignore on an email message, Outlook deletes that email and it also keeps track of all future emails related to the ignored message. If a future email related to the originally ignored email arrives in our Inbox, Outlook automatically moves these future emails to our Deleted Items folder.
 
But how about if we no longer want to ignore a particular conversation? Easy! Simply remove the “ignore” status of the email thread using the following steps:
    1. Select your Deleted Items folder;
    2. Select the email that is currently set to be ignored by Outlook;
    3. Click Ignore on the Delete section of the Home tab on the ribbon:
 
    4. If prompted, click Stop Ignoring Conversation:

 At this point, the email is automatically moved from our Deleted Items folder to the folder from which the it originated, and future emails for this thread will not be automatically deleted.

We can determine if an email is being ignored by the status of the Ignore button in the ribbon. If the Ignore button is highlighted (as in the screenshot above), the conversation thread on that email is currently being ignored by Outlook.

When we enable the Ignore option on a conversation, a message is created in the Associated Contents table of the Conversation Action Settings folder of our mailbox (which we can look at using MFCmapi for example):


It is important to have the following in mind:
  • If there is no activity on a thread for 14 days, the conversation action message for the thread is automatically deleted;
  • The age of the conversation action message is determined by the oldest message for the conversation;
  • We can modify the number of days at which the conversation action messages expire using the following registry data:
    • Key: HKEY_CURRENT_USER\Software\Microsoft\Office\x.0\Outlook\Options\Conversations
    • DWORD: OnGoingActionsExpiration
    • Value: integer specifying the number of days after which an inactive conversation has its conversation action message deleted.
  • We can start Outlook using the following switch to delete all conversation action messages: Outlook.exe /CleanConvOnGoingActions. Using this switch will not move emails back to their original location, but because the conversation action message no longer exists for the conversation, any new messages for the conversation will remain in the Inbox;
  • We can also get different behavior from this feature, depending on the version of Exchange being used:

o   With Exchange 2007 and a cached mode profile, Ignore is based on SUBJECT. For example, any message with “Help!” as the subject will be automatically sent to Deleted Items as long as we clicked Ignore for a previous message with Help! as the subject;

o   With Exchange 2010 and later versions, Ignore is based on the CONVERSATION ID and only the messages related to the same ignored conversation are automatically sent to the Deleted Items folder.


Wednesday, June 15, 2016

432 4.3.2 STOREDRV.Deliver; recipient thread limit exceeded

The Exchange Team wrote a post named Store Driver Fault Isolation Improvements in Exchange 2010 SP1 a while back regarding a new feature introduced in Exchange 2010 SP1 to throttle the volume of messages delivered to a single recipient.
 
However, this featured caused some issues for organizations with a large volume of emails to Public Folder and, more commonly, a Journal mailbox. In these cases, administrators will see mail queues with the following error:
432 4.3.2 STOREDRV.Deliver; recipient thread limit exceeded
 
The solution mentioned is to create the following two keys:
<add key="RecipientThreadLimit" value="2" />
<add key="MaxMailboxDeliveryPerMdbConnections" value="3" />
 
And add them to the EdgeTransport.exe.config file (located at ...\Program Files\Microsoft\Exchange server\V15\Bin).

However, for organizations using Exchange 2013 or 2016, these two keys need to be added to the MSExchangedelivery.exe.config file located in the same folder!

After adding the keys, restart both the Microsoft Exchange Transport (MSExchangeTransport) and Microsoft Exchange Mailbox Transport Delivery (MSExchangeDelivery) services.