Saturday, July 30, 2016

Exchange Lab in Azure

Do you want to set up an Exchange 2016 lab so you can test it but you do not have the resources to do so? Or perhaps you want a small lab that you can access from anywhere? Azure might be your solution!
 
Microsoft has recently released a guide with step by step instructions on how to set up an Exchange 2016 dev/test deployment in Azure. The end result, if you follow the guide, is a small environment with one Exchange server and one Domain Controller.
 
By default, this is only for internal email and application testing as external email flow is not configured, but this is something that you can add at a later stage. Exchange will, however, accept (external) incoming connections on port 443 for admin and testing    :)
 
If you do not already have an Azure subscription, you can sign up for an Azure Free Trial. If you have an MSDN or Visual Studio subscription, see Monthly Azure credit for Visual Studio subscribers.
 
For the full step-by-step guide, please go to Exchange 2016 dev/test environment in Azure.

Thursday, July 28, 2016

Clear Outlook AutoComplete Cache

Microsoft Outlook maintains a nickname list that is used by both the automatic name checking feature and the automatic completion feature. The nickname list is generated automatically as users use Outlook. If the nickname cache is corrupted, Outlook may be unable to identify recipients, may offer incorrect recipients when automatically completing the email address, or may send the message to the wrong person.
Please note that the AutoComplete list for Outlook is specific to Outlook and is not shared by Outlook Web App (OWA). OWA maintains its own AutoComplete list.

Unlike earlier versions of Outlook that store the nickname cache in a file on the local computer, Outlook 2010 and later versions store the nickname cache in the user’s primary message store. This means that deleting the entire nickname cache is no longer a matter of deleting the famous .NK2 file.

To reset the whole Outlook nickname cache for Outlook 2010 and later versions, first open Outlook, go to the File tab, click Options, click the Mail tab and, under Send messages, click Empty Auto-Complete List:

Outlook will then generate a new nickname cache.

Alternatively, you can close Outlook, click the Start menu, click Run (depending on which version of Windows you are using), and start Outlook by using the /CleanAutoCompleteCache switch: Outlook.exe /CleanAutoCompleteCache
Outlook will start up and generate a new nickname cache.

Exchange Shell Certificate Error

The other day, a colleague of mine experienced an issue when updating the certificate for one of his Exchange servers. After using the EAC to update the certificate, the Exchange Management Shell would not start and give the following error:
New-PSSession : [server.domain.com] Connecting to remote server server.domain.com failed with the following error message : [ClientAccessServer=server,BackEndServer=server.domain.com,RequestId=357032aa-2312-477e-be88-8d99 db9027c5,TimeStamp=07/12/2016 23:10:21] [FailureCategory=Cafe-SendFailure]  For more information, see the about_Remote_Troubleshooting Help topic.

In the System event log we would find the following:
Log Name:      System
Source:        Microsoft-Windows-HttpEvent
Date:          6/18/2016 4:45:40 PM
Event ID:      15021
Level:         Error
Computer:      server.domain.com
Description: An error occurred while using SSL configuration for endpoint 0.0.0.0:444.  The error status code is contained within the returned data.

Because this was a passive server of a DAG, no users were connecting to it so they were not impacted. However, we were not able to access OWA/EAC directly on this server.

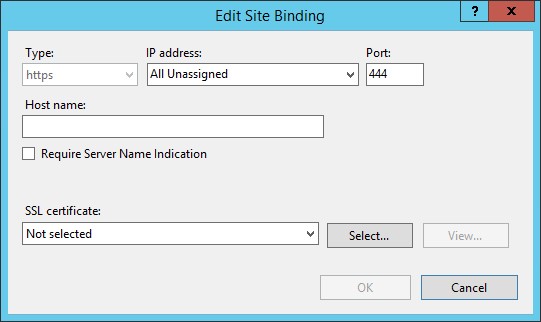
The problem turned out to be in IIS and the fact that the new certificate was not binding to the Exchange Back End site. To fix it, open IIS, expand the server name, expand Sites, right-click on Exchange Back End and select Edit Bindings. In the new window, select https and then click Edit...:

As you can see, no SSL certificate was selected:

To fix it, simply select the new certificate from the SSL certificate drop-down box and click OK.